If you’re using Clicker on a Chromebook, take a look at the image below. Does this appear when you open a Clicker App?
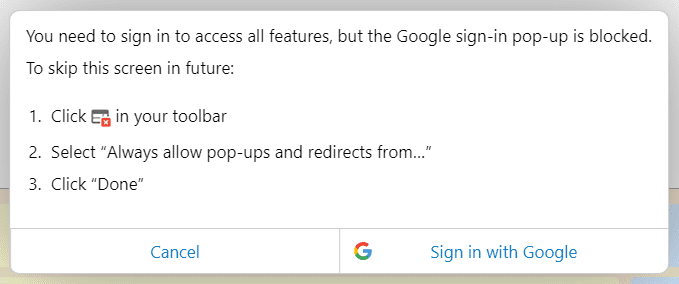
Yes? Then keep reading so you know how to make opening your Clicker Apps as smooth as possible!
Due to Google’s security policies, the Google account login window needs to appear every time a Clicker App is opened, and that’s classed as a ‘pop-up’. All you need to do is a small settings ‘tweak’ to allow, or ‘enable’, pop-ups, because we require the Google login for licensing.
How to enable pop-ups
Pop-ups can be enabled by clicking the “Pop-up blocked” icon on the right of the address bar and selecting “Always allow”:
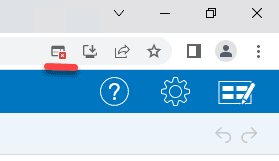
If the "Pop-up blocked” icon doesn’t appear, or if you want this to apply to all users, please send your IT Support the instructions below.
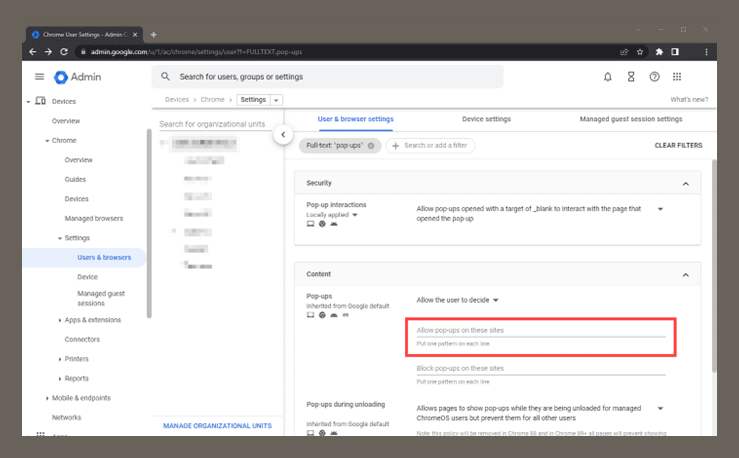
- Sign in to the Google Admin Console (admin.google.com) as an administrator. On the left pane, go to Devices > Chrome > Settings > Users & browsers.
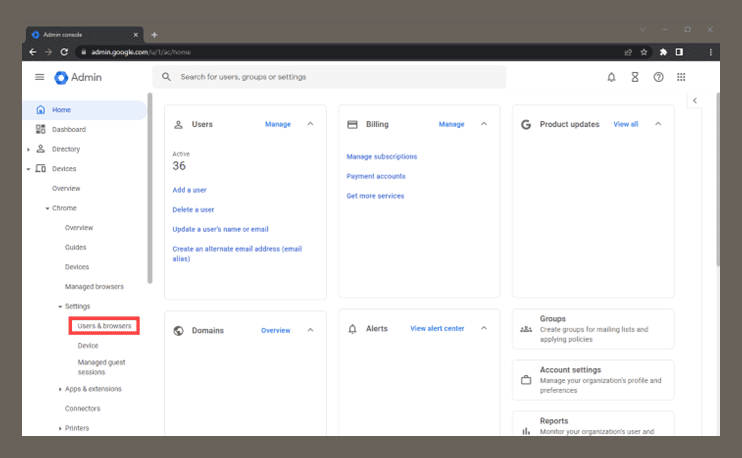
- Select the correct organizational unit containing the users who need to have pop-ups unblocked on the Clicker Apps. We recommend unblocking them for all users.
- Type pop-ups in the Search or add a filter field.
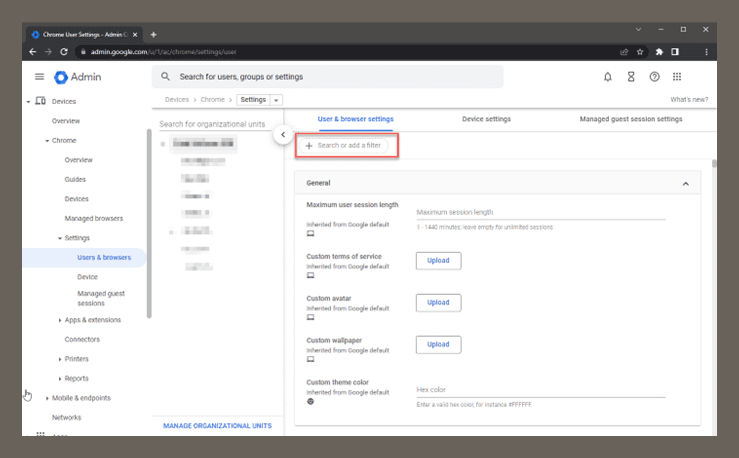
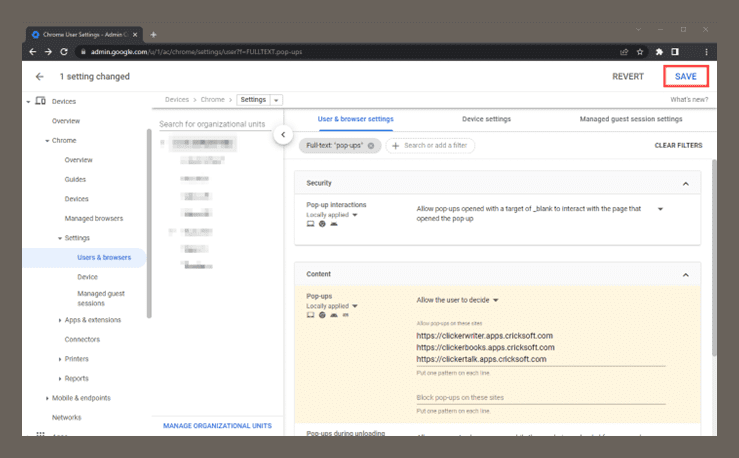
- Under Content, you will find a section named Pop-ups. Under Allow pop-ups on these sites, enter:
https://clickerwriter.apps.cricksoft.com
https://clickerbooks.apps.cricksoft.com
https://clickertalk.apps.cricksoft.com
5. Once you’ve entered the web addresses, click Save in the upper-right corner.
As always, if you ever need technical support, our friendly team are here to help! Please fill in our contact support form with any queries.
For our support blog this week, we are continuing to explore the most asked questions that the Support Team receive from Clicker users. Today we are going to look at how you can make your own picture libraries available to use within Clicker for Windows/Mac.
Whether used for visual stimulation, talking points, or to aid understanding, pictures are a valuable tool for supporting literacy development, so…
Clicker’s ‘Picturize’ button enables you to instantly add pictures to cells in any Clicker Set, including Sentence Sets, Connect Sets, Word Banks, and to whole passages of text within a document. You can choose from over 4500 Clicker curriculum pictures, but you may wish to incorporate your own images and photos too. Here’s how:
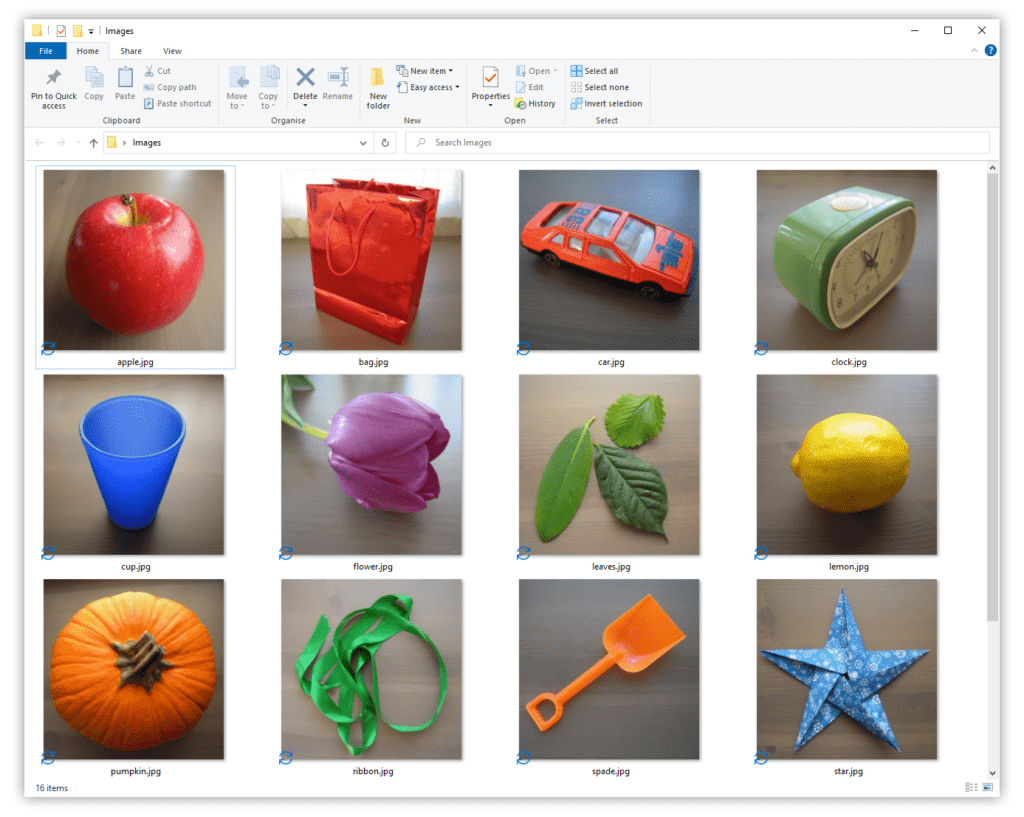
- Begin by creating a folder on your computer (choose somewhere it won’t be easily deleted).
To create a folder, right-click and choose New, then Folder - Place all images you would like to be used in Picturize inside this folder. Make sure they are named after the word you would like them to represent.
- Inside Clicker, head to the top Options ribbon tab, then Pictures.
- Click the Picturize tab.
- Click the + icon in the bottom-right corner.
- Choose Browse, then find the folder you created and click OK.
- Either leave the Label as it is or change it. This doesn’t affect anything, other than what it’s displayed as.
- You should now see the newly added folder in the Get pictures from: list. Click the folder, then click the
 arrow to move it up the list.
The higher it is up the list, the more it is prioritised. For example, if CrickPix2 has an image for “dog” and you also have an image for “dog”, as long as your folder is higher up the list, your image will be used.
 arrow to move it up the list.
After following these steps, Picturize will automatically select the newly added pictures.
Remember, if you ever need our support, we’re just a phone call or a click away:
Call: 203 221 2697 or visit: https://us.cricksoft.com/contact-support/
The predictor is one of the many fabulous features of Clicker and DocsPlus. Using the predictor results in greatly improved coherence, spelling and grammar, and helps to increase the writing productivity of learners who struggle to transfer their knowledge and ideas to the page. Sometimes you may find that the predictor is ‘unavailable’ to use – but don’t worry, this isn’t the case! And there’s a really simple fix that I’m going to walk you through here.
What happens when the predictor isn’t available?
If you find that the predictor is dimmed or ‘greyed out’ and can’t be used, this is only temporary and can be easily fixed.
So why does this happen?
This usually happens when the program is launched and then closed in quick succession, this can lead to the predictor not being able to load fully.
How do we fix this?
By following the steps given below you will be up and running in no time at all!
If Clicker 8 has been updated within the past month, you can:
- Head to the “Options” ribbon tab up top, then “Manage”.
- Go to the “Advanced” tab.
- Click “Rebuild Predictor database…”, then “Yes”.
It may take a few seconds, but after that the predictor should work.
If you haven’t updated Clicker 8, we recommend doing so by visiting activate.cricksoft.com and either entering your serial number or log in details.
REMEMBER: YOU CAN UPDATE CLICKER 8 BY INSTALLING THIS VERSION OVER THE CURRENT VERSION, WITHOUT THE NEED TO UNINSTALL!
For those who haven’t updated Clicker 8 in the last month or use DocsPlus:
WINDOWS
- Close Clicker / DocsPlus.
- Right-click the Windows Start button and choose Run.
- Type C:\ProgramData\Crick Software into the box and click OK.
- Right-click the Predictor folder and choose Delete.
Your Windows account may not have permission to access the ProgramData folder. If so, please forward this to your IT Support.
MAC
- Close Clicker / DocsPlus.
- Browse to this location in Finder:
Macintosh HD\Library\Application Support\Crick Software - Right-click (or hold ‘Control’ and then click) the Predictor folder and choose Move to Trash.
After following these steps, launch Clicker / DocsPlus. The predictor icon should become active within 5 to 50 seconds.
And just like that, predictor will be available again for you to use! Remember, if you ever need our support, we’re just a phone call or a click away:
Call: 203 221 2697 or visit: https://us.cricksoft.com/contact-support/
With the new school year well underway, Support has been super busy with enquiries regarding managing apps licenses. So, let’s look at what it’s all about!
How do I manage them?
The Apps Subscription Manager function allows authorised individuals to manage the allocation of licenses that are used on iPads and Chromebooks. Whether allocating licenses for the first time, keeping track of current licenses or reallocating licenses, this tool keeps it simple!
Who can access the portal?
Those identified as Subscription Managers that also have an existing Google/Apple account.
What’s the benefit?
Schools are always busy, so it’s important that you can log in and manage your licenses at a time that suits you. We are always happy to help of course, but here are some simple instructions if you choose to manage your licenses yourself.
Where to start?
- Sign into apps.cricksoft.com with your Google Account or Apple ID.
- Click the subscription's Manage button to see a list of activated iPads/Chromebook users.
- Follow the on-screen instructions to:
- add Chromebook users
- add iPads
- remove current Chromebook users / iPads
Is adding a Subscription Manager complicated?
No, simply provide the existing Google or Apple account of those you wish to add along with your Organization ID. These can be submitted to us by emailing support@cricksoft.com or using our support form. You will then receive an email confirming your request has been actioned.
REMEMBER:


Don’t forget, if you have a student support subscription or Flexi-license, all Chromebook users should be licensed automatically (the apps should launch with no messages). If this isn’t happening, please contact Support to provide us with your Google domain.

If you need any advice or assistance with managing your subscription, or any element of our software and apps, please don’t hesitate to contact us at support@cricksoft.com or call us on 01604 671691.